
Rack Mounting Options for your Electronic Equipment
A rack mount is a description of a hardware device capable of being mounted in an equipment rack. All types of electronics and computing devices come in rack-mounted packages including servers, test instruments, telecommunications components, which are bolted to the side frames of the rack. Note: shelves are available for equipment that is not rack mounted.
Measuring cabinet dimensions, specifically depth
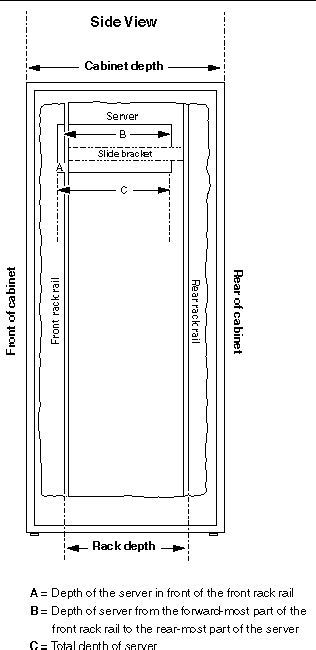
Before ultimately choosing a rack mounting option, let’s first review how to properly measure your rack space. As a reminder, cabinets or enclosures are traditionally referred to by their external dimensions. But in most cases, the rack depth is 4 to 6 inches less than the external cabinet depth.
To measure the rack depth, measure the distance between the forward-most part of the front rail to the rear-most point of the rear rail. A&J typically recommends 34 in. (86.36 cm) or greater cabinets for use with equipment that have an average depth of 28 in. (71.12 cm). The 6 inches (15.24 cm) at the back between the equipment and the back door or panel allows for cable management, airflow and maintenance access.
Equipment mounting options
Originally mounting holes were tapped with a particular screw thread, but has since become problematic where equipment is frequently changed because the threads are easily damaged or the mounting screws can break off. Both problems render the mounting hole unusable.
Tapped-holes were then replaced by clearance-hole racks. Holes are large enough to permit a bolt without binding and fastened in place using cage nuts.
The third innovation has been square-hole racks. These racks allow boltless mounting where the weight of the equipment and small retention clips are all that is necessary to hold equipment in place.
The structural support
A key structural weakness of front-mounted support is the bending stress placed on the both the rack itself and the mounting brackets of the equipment. Our A&J racks can incorporate front and rear rails that may be moved forwards and backwards that allows equipment to be supported by four posts, but also easily installed and/or removed.
Our standard AJR 150 Series 4-post racks are 22.31″ (566.6 mm) wide with three depths: 26″, 30″, 36″ (660.4 mm to 914.4 mm). The extra width and depth enables cabling to be routed with ease and deeper equipment to be installed. It can also accommodate “Zero-U” accessories such as PDUs and vertical cable managers in the space between the rear rails and the side of the enclosure.
Rails (slides)
Often used for heavy equipment that requires regular servicing, a pair of rails can be mounted directly onto the rack which allows the component to slide into the rack along the rails. The equipment can then be bolted to the rack (as described above) or the rails may also be able to fully support the equipment in a position where it has been slid clear of the rack. Consider purchasing a cable management arm, which folds the cables attached to the server or component and allows them to expand neatly when the rail is slid out, without being disconnected.
Tools required
You will need some of the following tools to rackmount your equipment:
- Philips No. 1, No. 2, and No. 3 screwdrivers
- Flat-blade No. 1 and No. 2 screwdrivers
- Allen and adjustable wrenches
- Needlenose pliers
- Level
- Electrostatic discharge (ESD) wrist strap
- ESD mat
Rack Mounting Tips & Guidelines
- Install the heaviest equipment and storage devices in the lowest position in the rack to prevent the rack from becoming too-heavy and prone to tipping over.
- Install any remaining equipment from the lowest system upward into the rack.
- For applications that require high-density cabling, you may need 1U of horizontal cable management for every 1U of patch panels or switches.
- Ensure the rack is properly secured to the floor or ceiling and level before installing any components.